
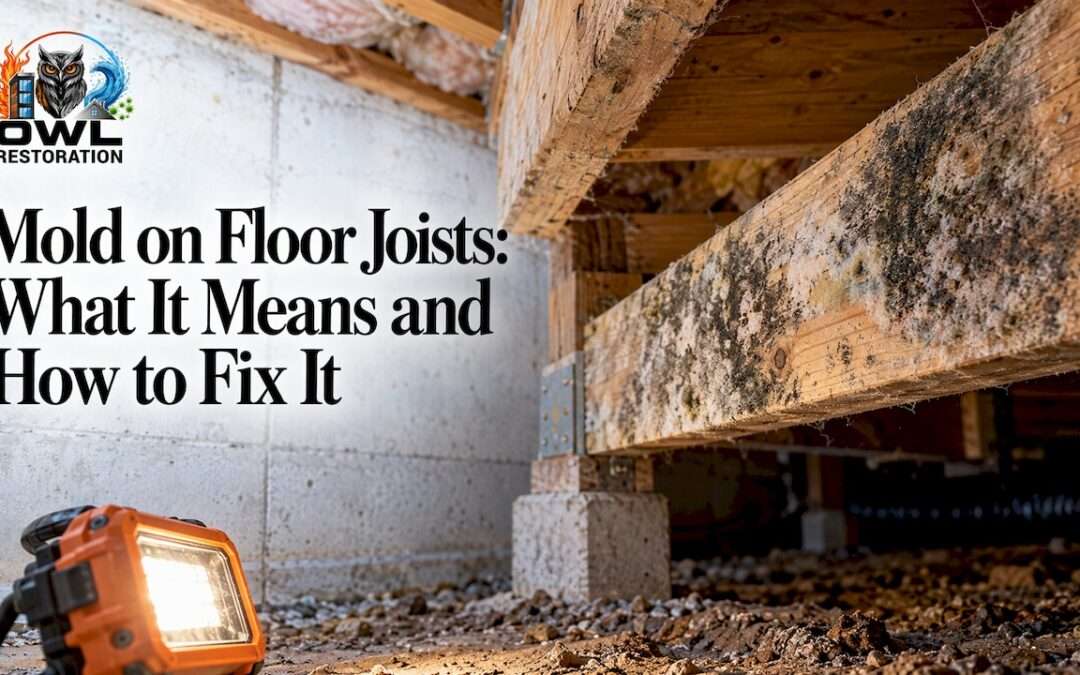
Mold on floor joists means moisture is reaching the wood under your home, and the growth will return until that moisture is fixed. A small patch on a joist can usually be scrubbed off with detergent and water once the wood is dry. Larger areas, soft wood, or growth after a leak call for a professional. This guide shows how to tell mold from rot, what to do first, and where the line sits between a weekend job and a remediation job.
TL;DR
- Mold on joists is a moisture signal. Find the source (a leak, poor drainage, high humidity, a damaged vapor barrier) before you clean anything.
- The EPA says you can usually handle an area smaller than about 10 square feet yourself. Anything larger, or any growth after significant water damage, is professional territory.
- For structural wood, detergent and water with a bristle brush is the recommended cleaning method, not bleach.
- Probe the wood. Surface mold wipes partly away, while rot leaves joists soft and weak, which is a structural question.
- Dry wet materials within 24 to 48 hours of a leak and keep humidity under 60 percent to keep mold from coming back.
Table of Contents
- What mold on floor joists looks like
- Mold or rot: how to tell the difference
- Why mold grows on floor joists
- How to remove mold from floor joists
- When to call a professional
- Our perspective
- What professional mold remediation involves
- Ready for help in Dallas-Fort Worth
- How to keep mold from coming back
- Documenting joist mold for an insurance claim
- FAQ
- Sources
What mold on floor joists looks like
Mold on joists does not look one way. According to crawl space mold guidance from InspectandTest, it can appear as black, green, gray, or white patches on joists, the subfloor, and the rim board. White, cottony or fuzzy growth on wood is common. It can also be confused with efflorescence or plain staining.
CrawlSpace Fixes makes a point worth remembering: fuzzy, powdery, spotted or streaked growth in many colors cannot be identified by color alone. Color does not tell you the species, how dangerous it is, or whether the wood is structurally damaged. So do not decide a patch is harmless because it is white or serious because it is black.
How common is it?
More common than most owners expect. A study of 45 homes in North Carolina found that 62% had visible mold growth and 67% had wood moisture readings at levels that support mold (19% or higher). Vented crawl spaces in humid climates are especially prone, and North Texas summers bring plenty of humidity and sudden storms.
Signs to look for beyond the visible patches
- A musty smell under the floor or in rooms above it
- Dark staining that follows the line of a pipe, vent or foundation wall
- Damp insulation, sagging batts, or a torn or missing vapor barrier
- Condensation on ducts or pipes near the joists
- Floors that feel soft, bouncy or uneven
Mold or rot: how to tell the difference
This matters because the two problems have different fixes. Surface mold and wood rot often show up together, but they are not the same thing.
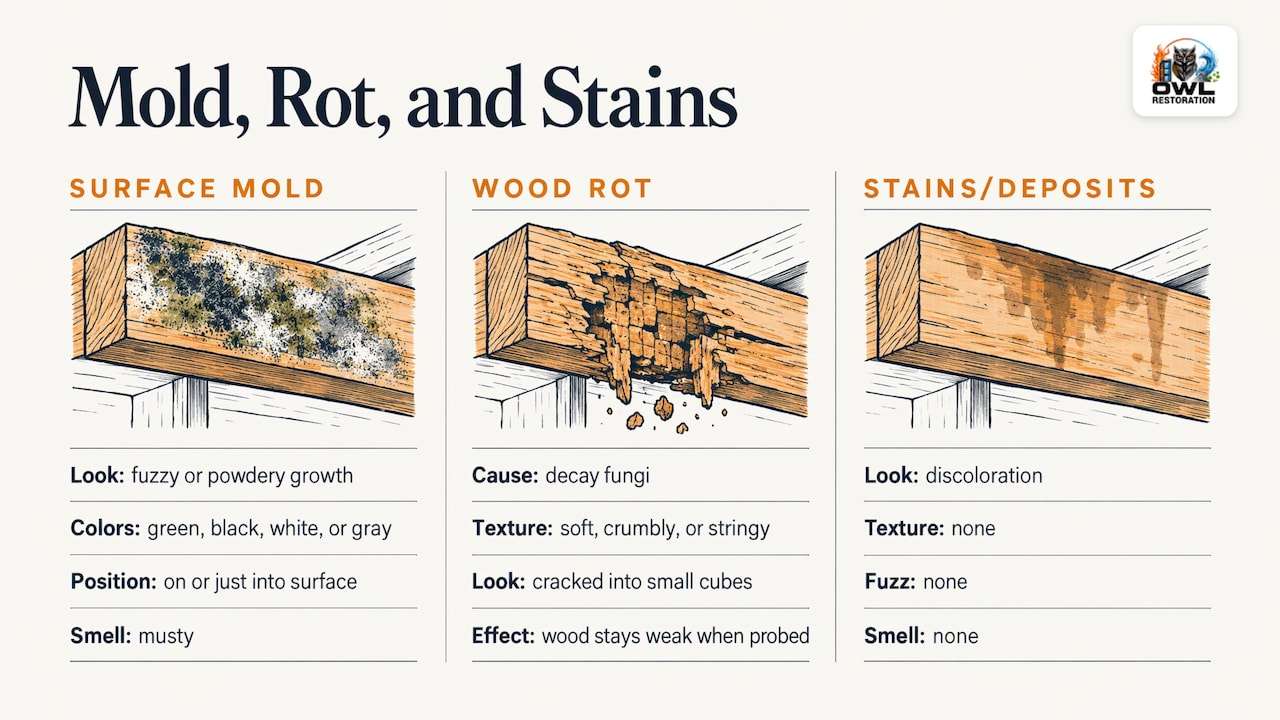
InspectandTest describes surface mold as fuzzy or powdery growth in green, black, white or gray that sits on or just into the surface. Wood rot, caused by decay fungi, breaks down the structure of the wood. Rotted wood turns soft, crumbly, stringy or cracked into small cubes. A practical field check from the same guide: surface mold often wipes or scrubs partly away and smells musty, while rot leaves the wood physically weak when probed. Stains and mineral deposits are discoloration with no texture, fuzz or smell.
The screwdriver test
Crawl space professionals commonly use a screwdriver to check for rot. According to Carolina Home Problem Report, healthy structural wood resists the tip and the screwdriver does not penetrate. If the tip sinks in under moderate pressure, the wood is structurally compromised. Penetration of half an inch or more under light pressure points to significant structural loss.
Probe in several spots, including near the ends of joists where they sit on the sill or beam, since that is where water tends to collect. Wear eye protection, gloves and a respirator while you are under the house. If a probe goes deep, stop cleaning and call a professional. The EPA advises consulting a structural engineer or other qualified professional when mold is suspected of damaging the structural integrity of a building.
Other structural warning signs
The Pacific Northwest National Laboratory’s Building America Solution Center lists sagging floor joists, sawdust, mold or mildew on wood, posts not making contact with the pier, and large cracks in support members as signs of structural problems in crawl spaces. Common causes include high moisture, poor soil conditions at construction, and wood-boring insects. Sawdust or fine frass under a joist suggests insects, not just moisture.
Why mold grows on floor joists
Mold needs organic material and moisture. Wood supplies the first. Your job is to take away the second.
The PNNL guide lists the usual crawl space moisture sources: water or sewer leaks, rain or snowmelt entry, a nonworking dehumidifier, and a torn, poorly installed or missing floor vapor barrier. It also gives numbers to check against. Wood moisture content above 18% is a problem, and so is air relative humidity above 70%. A pin-type moisture meter and a simple hygrometer cost little and tell you where you stand.
Hunt the source first
- Check plumbing. Look at supply lines, drain lines, water heater connections and the area under bathrooms, kitchens and laundry rooms. A slow drip over a few months is enough.
- Check outside. Gutters, downspouts and grading should move water away from the foundation. The EPA lists cleaning and repairing gutters and grading the ground away from the foundation among its moisture control steps.
- Check the HVAC. Leaking ducts, clogged condensate lines and dirty drip pans all add water. The EPA recommends keeping air-conditioning drip pans clean and drain lines unobstructed.
- Check the ground cover. A missing or torn vapor barrier lets ground moisture rise into the air and the wood.
- Think about timing. Did the growth appear after a storm, a pipe burst or an appliance failure? Dated events help later if you file a claim.
The EPA is blunt on this point: if you clean up the mold but do not fix the water problem, the mold will most likely come back. Cleaning without a fix is the most common reason a job fails.
How to remove mold from floor joists
For a small, dry patch on solid wood, the method is simpler than most online advice suggests.
What the guidance recommends
The NIEHS disaster recovery guidance says structural wood such as studs, sill plates, floor and ceiling joists and sheathing with mold should be bristle brushed with a detergent solution, such as dishwashing liquid. It discourages bleach because its reactions with many household products put users at risk. The EPA’s cleanup page likewise tells homeowners to scrub mold off hard surfaces with detergent and water and dry the area completely.
That also answers the common bleach versus vinegar question. For wood, bleach is the weaker choice: much of it is water that soaks in while the chlorine stays near the surface, so it can lighten a stain without dealing with growth below. Detergent, physical scrubbing and thorough drying do the real work.
Step by step for a small area
- Protect yourself. Wear an N95 or better respirator, goggles without vent holes, long sleeves and gloves. Mold work in a tight crawl space stirs up a lot of particles.
- Fix the leak and dry the wood first. Cleaning wet wood invites regrowth. Use fans and a dehumidifier until a moisture meter reads in a safe range.
- Scrub. Use a stiff bristle brush and a detergent solution. Work in small sections and keep the wood from becoming soaked.
- Wipe and dry. Remove residue with a damp cloth, then dry the wood fully.
- Vacuum with a HEPA vacuum if you have one, to pick up loosened particles.
- Bag waste. Seal rags, brushes you will not reuse and any removed material in plastic bags.
- Recheck over the following weeks. Fuzzy regrowth means moisture is still present.
What not to do
- Do not paint or caulk over it. The EPA says to clean up the mold and dry the surface before painting because paint over moldy surfaces is likely to peel.
- Do not fog or seal and walk away. Encapsulating wet or half-cleaned wood traps the problem. The NIEHS guidance warns that coated wood may dry much more slowly in future flooding and be more vulnerable to rot.
- Do not mix cleaners. Bleach plus ammonia or acids creates dangerous fumes.
- Do not keep porous materials that are heavily colonized. The EPA notes that porous materials like carpet and ceiling tiles may have to be thrown away, because mold can fill the empty spaces in porous materials and be difficult or impossible to remove completely. Insulation and fiberglass batts touching moldy joists fall in this group.
When to call a professional
A small patch is one thing. These situations are different:
| Situation | Why it needs a pro |
|---|---|
| Growth covers more than about 10 sq ft (roughly 3 ft by 3 ft) | The EPA says that above this size you should consult its larger-job guidance; Illinois public health officials also advise consulting a professional over 10 sq ft |
| The water was sewage or otherwise contaminated | The EPA says to call a professional |
| A screwdriver sinks into the joist | Possible structural loss needs a qualified assessment |
| Mold is in insulation, subfloor layers or hidden cavities | Porous and concealed growth is hard to reach and remove fully |
| Someone in the home has asthma, allergies or a weakened immune system | Disturbing mold exposes them; ask their doctor about precautions |
| Mold came back after a cleanup | There is an active moisture source still unfound |
For wet-wood jobs after a leak or storm, speed matters. Mold can start forming within 24 to 48 hours of flooding, so water damage and mold work often overlap. If the cause was a burst pipe or appliance leak, our water damage restoration team can dry the structure before growth spreads.
Do you need testing?
Often you do not need a lab to know there is mold, since you can see and smell it. Testing earns its cost when you need documentation, when you suspect hidden growth, when you want to confirm a cleanup worked, or when an insurer, buyer or landlord needs a written record. Our mold testing and inspection is $600 for a residential property and $975 for a commercial one. Additional samples are $75 each residential and $95 each commercial.
Our perspective
We get called to joists at two moments: right after water, and months after someone has already cleaned and painted. The second call is harder, because the wood has been sealed over a problem nobody traced.
Our approach starts with the water. We find where the moisture came from, dry the structure, then deal with the growth. In a crawl space that means looking at the whole picture: plumbing, grading, ground cover, ducts and airflow. A joist that looks clean is not finished until it reads dry and the cause is dealt with.
We also work from one team through the whole job. Mitigation, mold remediation and, when joists or subfloor have to come out, reconstruction and build-back happen under one roof, and we coordinate directly with your insurance company. That saves homeowners from juggling three contractors in the middle of a stressful month.
If you are looking at a patch bigger than a doormat, or at wood that feels soft, send us photos. We would rather look early than rebuild later.
Dustin
What professional mold remediation involves
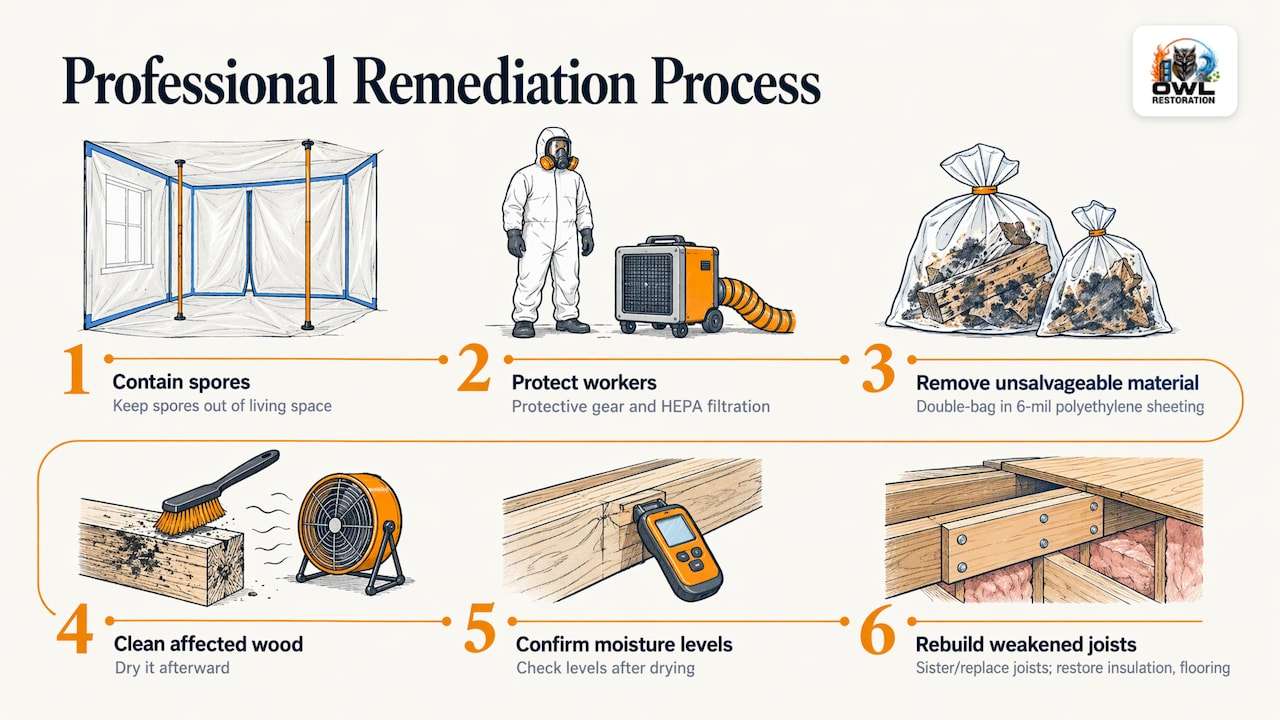
A professional job follows a protocol, not just a stronger cleaner. Containment keeps spores from spreading into living space. Workers wear protective gear and use HEPA filtration. Materials that cannot be cleaned are removed, and the EPA’s larger-building guidance describes double-bagging non-salvageable moldy materials in 6-mil polyethylene sheeting before they leave the containment area, to limit spore dispersal. Affected wood is cleaned and dried, and the crew confirms moisture levels afterward.
Where joists have lost strength, reconstruction may include sistering or replacing members and restoring insulation and flooring. We handle that as part of our mold remediation and reconstruction services, so the structure is rebuilt by the same team that removed the problem.
Ready for help in Dallas-Fort Worth
Owl Restoration handles water, fire and mold problems across Dallas, Tarrant, Ellis and Johnson counties, with 24/7 rapid response and direct insurance coordination. For mold, a written inspection gives you a clear picture before work starts. Our residential Mold Remediation Protocol is listed at $1,000, and our team can explain what it covers for your property. Start at our mold testing page, or reach us through the Owl Restoration home page for emergency response.

We serve homeowners and property managers in places like Arlington, Mansfield and Midlothian, and business owners can see our commercial restoration services.
How to keep mold from coming back
Prevention is moisture control, and the numbers are specific.
- Dry fast. The EPA says that if wet areas are dried within 24 to 48 hours of a leak or spill, in most cases mold will not grow. Commercial firms use large fans and dehumidifiers for this, as EPA course material explains.
- Hold humidity down. The EPA recommends keeping indoor humidity below 60 percent, ideally between 30 and 50 percent. PNNL flags crawl space air above 70% as a problem.
- Repair the vapor barrier. Cover bare soil completely, overlap seams and seal edges where practical.
- Manage water outside. Clean gutters, extend downspouts and keep soil sloping away from the foundation.
- Watch the equipment. If you run a crawl space dehumidifier, check that it is working. PNNL lists a nonworking dehumidifier as a moisture source.
- Inspect twice a year. A flashlight, a moisture meter and ten minutes after a heavy rain catch problems while they are small.
Documenting joist mold for an insurance claim
If the mold followed a covered water event, documentation protects your claim. Note that mold damage is not covered under standard NFIP flood insurance policies, so check which policy applies to your loss.
United Policyholders advises owners to photograph, videotape and inventory damaged property, record dates, and document the source and extent of water intrusion and visible mold. It also suggests saving contaminated items until disputes are resolved in writing. A practical photo routine, as described by The Mold Consultant, is wide shots, mid-range shots, close-ups, scale shots with a tape measure or coin, narrated video, and repeat shots at each visit to show whether the area is growing, stable or drying.
Take your photos before cleaning, and keep receipts for moisture meters, dehumidifier rentals and any emergency work. We work directly with insurance companies, which helps keep the paperwork moving.
FAQ
Is mold on floor joists dangerous?
It can be a health and a structural concern. Mold releases spores that can aggravate allergies and asthma, and long-term moisture can let it weaken wood. Treat it as a sign to find the moisture source, wear a respirator if you disturb it, and ask your doctor about precautions if anyone at home has respiratory problems or a weak immune system.
Is it better to kill mold with bleach or vinegar?
For structural wood, neither is the first choice in current public guidance. The NIEHS guidance recommends scrubbing with a bristle brush and detergent solution and discourages bleach. Whatever you use, never mix cleaners, and dry the wood completely afterward.
Can I just paint or seal over mold on joists?
No. The EPA says not to paint or caulk moldy surfaces, and that paint over mold is likely to peel. Clean and dry the wood first. Sealing in moisture or growth hides the problem and can make wood slower to dry later.
How do I know if my floor joists are rotten?
Probe them with a screwdriver. Healthy wood resists the tip. Wood that gives under moderate pressure, or feels soft, crumbly or stringy, is compromised. Sagging floors and sawdust are additional warning signs. Call a qualified professional if the probe goes in deeply.
Does mold on joists always need a professional?
Not always. The EPA says you can generally handle a moldy area smaller than about 10 square feet yourself. Larger areas, contaminated water, concealed growth, soft wood or health vulnerabilities in the household are good reasons to bring in a licensed team.
Sources
- Crawl Space Mold: What Homeowners Need to Know, InspectandTest
- Mold-Like Growth on Crawl Space Floor Joists, CrawlSpace Fixes
- Liabilities of Vented Crawl Spaces and Their Impacts on Indoor Air Quality (AIVC)
- Mold on Wood: What Homeowners Need to Know, InspectandTest
- Crawl Space Wood Rot, Carolina Home Problem Report
- Look at Crawlspace for Moisture Issues, PNNL Building America Solution Center
- A Brief Guide to Mold, Moisture and Your Home, US EPA
- Mold Cleanup in Your Home, US EPA
- Mold Course Chapter 2, US EPA
- Mold Remediation in Schools and Commercial Buildings Guide, Chapter 3, US EPA
- NIEHS Disaster Recovery, Mold Remediation Guidance (eLCOSH)
- Reducing Your Exposure to Mold, Illinois Department of Public Health
- Document Flood Damage, National Flood Insurance Program
- Insurance Claim Tips for Mold Damage, United Policyholders
- How to Document Mold for Insurance Claims, The Mold Consultant